Lab 2-Bluetooth
Objective
In lab 2, we are required to be familiar with Bluetooth communication between the computer and the Artemis board. To accomplish that, we use the Jupyter Notebook and Arduino programming language as a tool to send the message. Here, we only need to do some basic practice to prepare for future lab usage.
Setup
To get started with lab 2, we have to do some environment setup. First, use "Python3" in the terminal to check the python version and make sure it is >3.9. Then, install venv and activate the virtual environment by sourcing it. The last step is to install the python package and start the Jupyter Nootbook using command Jupyter lab.
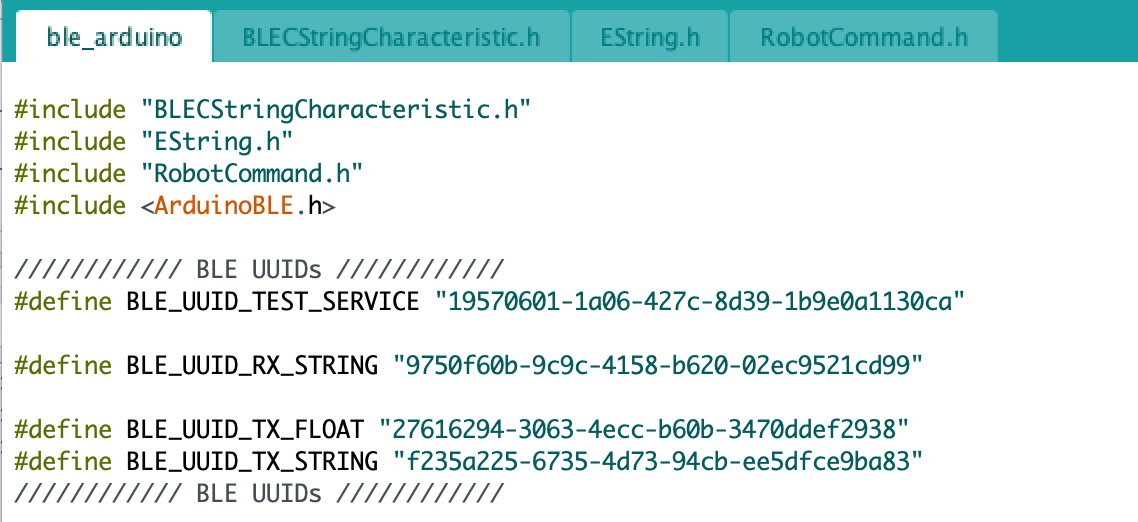
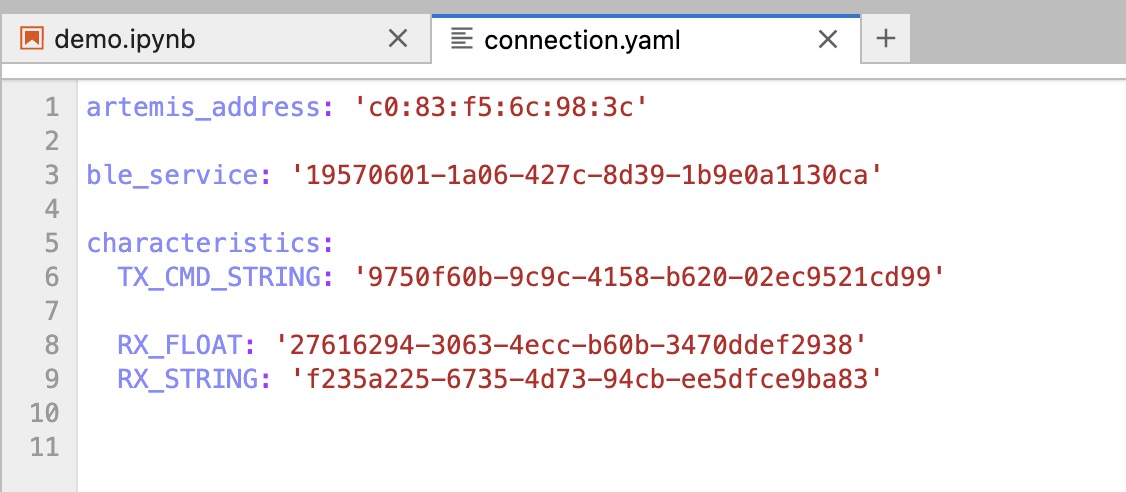
Now, we are ready to set the connection between the computer and the Artemis board. The MAC address can be got by running the ble_arduino, which is shown below.

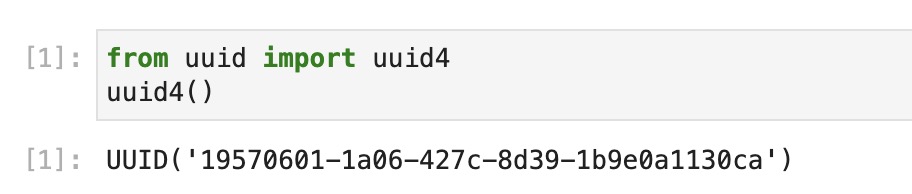
Then use the command provided to get a random UUID number.
The next step is to use the UUID number generated above and the MAC address to replace the ble_uuid_test_service number in ble_arduino and ble_service number and artemis_address in the "connection. yaml" file. When running the command, it will keep searching the surrounding Bluetooth. The same UUID number in "connection.yaml" and "ble_arduino" will automatically connect.
Now, we are well prepared for the Bluetooth connection. First, run through the demo.ipynb to the Configuration part. And then, the serial monitor will automatically show the connection.


Task 1: ECHO
	* Your code goes here.
             */
             tx_estring_value.clear();
             tx_estring_value.append("Robot says->");
             tx_estring_value.append(char_arr);
             tx_estring_value.append(":)");
             tx_characteristic_string.writeValue(tx_estring_value.c_str());
             Serial.print(tx_estring_value.c_str());
            break;
        /*
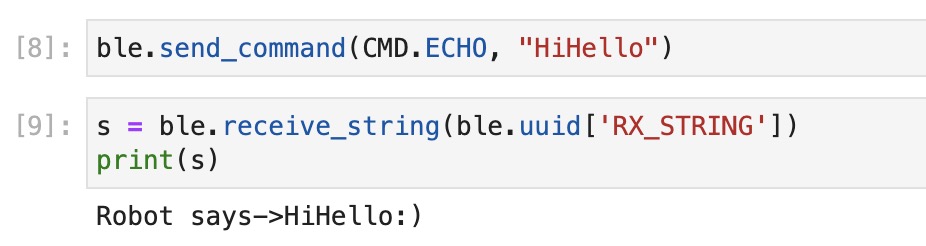
The first task is required to send the string from the computer to the Artemis board and get the augmented string from the board to the computer. I use the example command provided in ble_arduino, "tx_estring_value", to accomplish that. And then, use the "append" syntax to add the required format. In the end, the "tx_characteristic_string" is helpful to send the message to the Artemis board.
For the Python code, the most essential thing is to check the "cmd_type" file and add the cmd name. The code in Arduino is shown above and the code in Python is shown below.
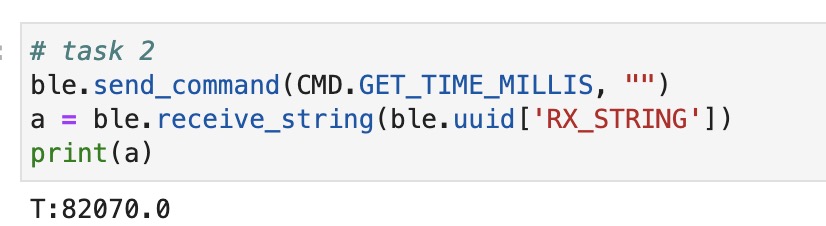
Task 2: GET_TIME_MILLIS
	case GET_TIME_MILLIS:
             tx_estring_value.clear();
             tx_estring_value.append("T:");
             tx_estring_value.append((int)millis());
             tx_characteristic_string.writeValue(tx_estring_value.c_str());
             break;
This task is required to get the current time from Artemis to the computer. The method to achieve this is very similar to task one. The only difference is the data type. The code in Arduino is shown above and the code in Python and the result is shown below. The result is represented in milliseconds.
Task 3: Notification Handler
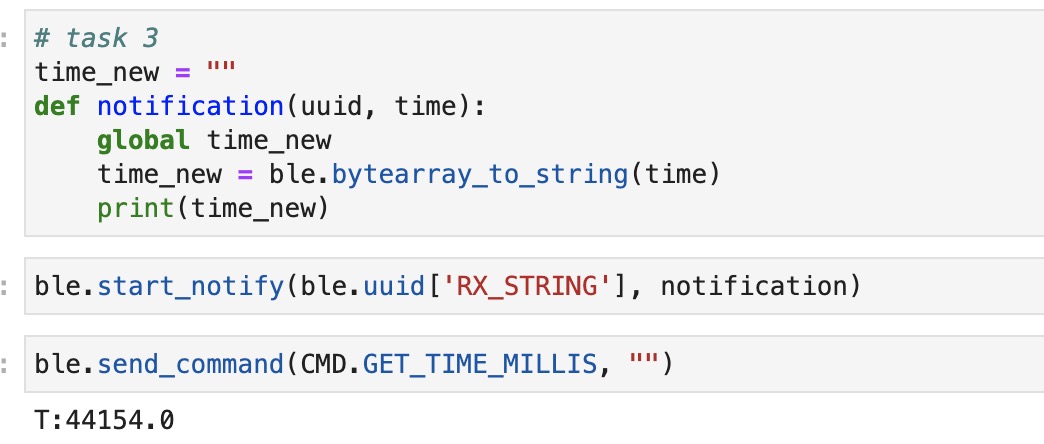
In task 3, we are required to set the notification handler to receive the string value from Artemis. It uses the callback function method to get the time. After settling this function, we do not need to run the receive string and print command every time. The only one we need is the "send_command". The system will automatically print what you want. The screenshot shown below is the callback function I got. It uses task 2 to prove the feasibility.
Task 4: GET_TEMP-5s
	case GET_TEMP_5s:
             tx_estring_value.clear();
             for (int i = 1; i <6; i++){
                tx_estring_value.append("T:");
                tx_estring_value.append((float)(millis()/1000));
                tx_estring_value.append("|C:");
                tx_estring_value.append(getTempDegC());
                if (i !=5){
                  tx_estring_value.append("|");
                }
                delay(1000);
             }
          tx_characteristic_string.writeValue(tx_estring_value.c_str());
		break;
In task 4, it is required to get the current temperature every second and last for 5 seconds. I use the for loop to run 5 times in total, and for each loop, I set a delay for 1000 milliseconds(1 second). Inside the loop, the algorithm is also similar to task 1. I use the syntax "getTempDegC" to get the current temperature in the unit of Celcius. To strictly follow the format, I also include an if loop to make sure there's no "|" symbol at the end. The code in Arduino is shown above and the code in Python and the result is shown below. Here, I still use the notification handler function I set up in task 3. Therefore, same as the get time millis example, I can get what I want by using just one line command. The result is represented in milliseconds and Celcius.

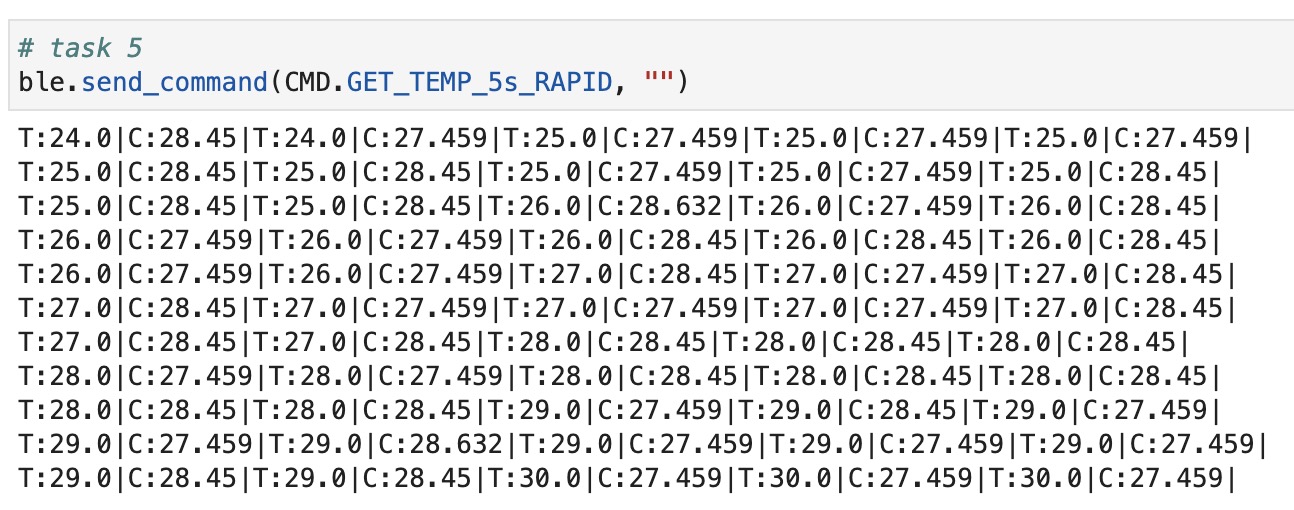
Task 5: GET_TEMP-5s_RAPID
	case GET_TEMP_5s_RAPID:
            for(int j = 0; j <11; j++){
             tx_estring_value.clear();
             for (int i = 1; i <6; i++){
                tx_estring_value.append("T:");
                tx_estring_value.append((float)(millis()/1000));
                tx_estring_value.append("|C:");
                tx_estring_value.append(getTempDegC());
                tx_estring_value.append("|");
                delay(100);
                }
          tx_characteristic_string.writeValue(tx_estring_value.c_str());
            }
          break;
In task 5, we have to get a more rapid temperature using a similar method in task 4. It requires showing at least 50 temperature values in 5 seconds. Based on the Arduino code used in task 4, I add an outer loop to make the system run 5 temperature data 10 times to get 50 data in total. And then, I also change the delay value from 1000 milliseconds (1 second) to 100 milliseconds (0.1 seconds). That will make the loop finish in 5 seconds to reach the task requirement. The code in Arduino is shown above and the code in Python and the result is shown below. Notes, the notification handler is used.
Task 6: Limitation
In this discussion question, we are required to figure out the limitation to send a 16-bit value with 150 Hz in 5 seconds to the Artemis board with the 384kB RAM. By doing the unit conversion, I got 1 kB = 8000 bits. So, 384 kB = 8000 * 384 = 3072000 bits. The Artemis board can receive the form of 16-bit values with 16 * 150 * 5 = 12000 bits every time. 3072000 / 12000 = 256. Therefore, the limitation of this problem is that the Artemis board can receive 256 times of 16-bit value with 150 Hz in 5 seconds before running out of memory.
Additional Task for 5000 Level Student
Additional Task 1
	case SEND_STRING:

              char char_arr1[MAX_MSG_SIZE];
              success = robot_cmd.get_next_value(char_arr1);
              if (!success)
                  return;
              tx_estring_value.clear();
              tx_estring_value.append(char_arr1);
              tx_characteristic_string.writeValue(tx_estring_value.c_str());

              Serial.print("Sent back: ");
              Serial.println(tx_estring_value.c_str());
              break;
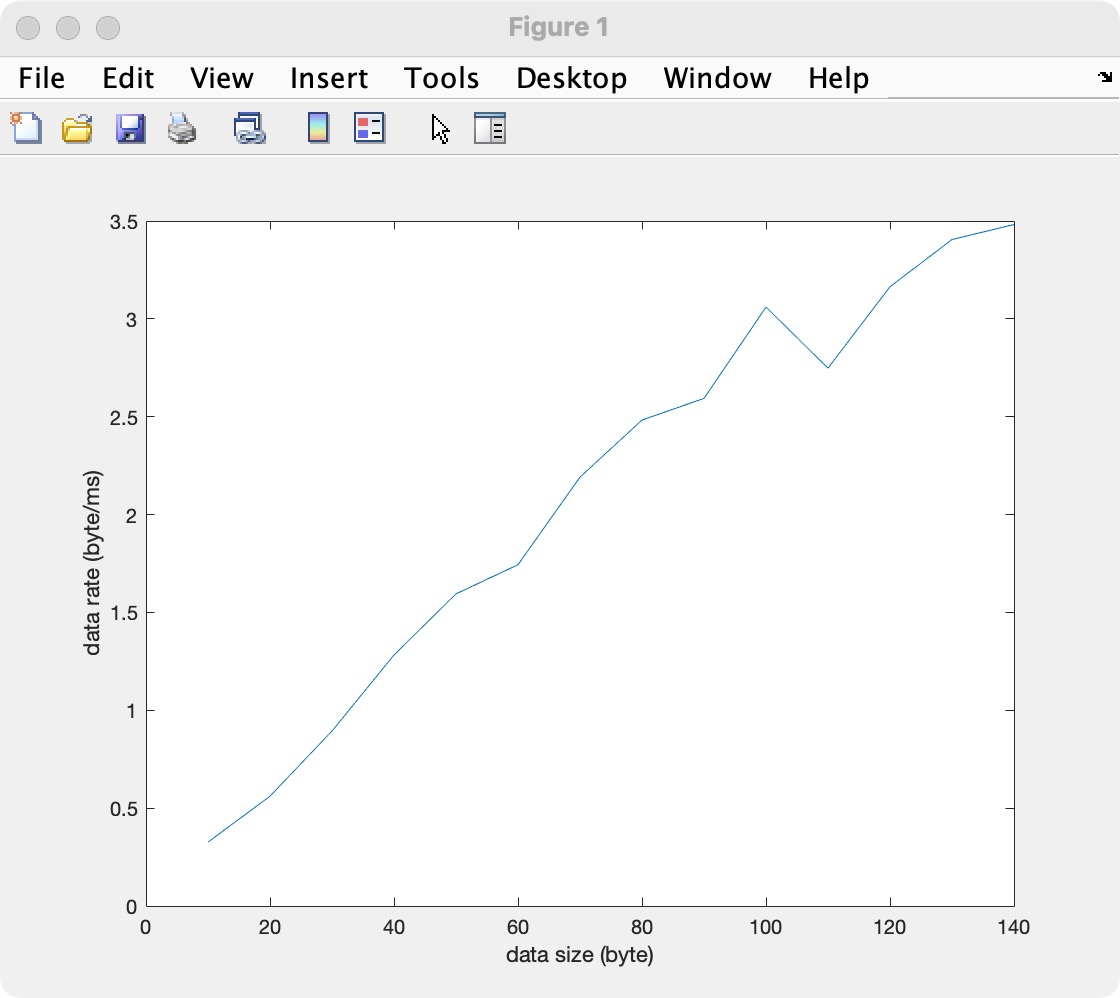
In this problem, I use Vincent Lu's Lab from 2022 as a reference. I create a new command called SEND_STRING to send the string from the computer and then receive a reply from the Artemis board. I use the syntax from the python library called "time.time" to record the current send and receive time. Then, we can get the specific time difference. The outer for loop is helpful to increment the message size and the inner for loop is trying to get the data 6 times to improve the accuracy. Then the data rate can be calculated as shown below. And the Arduino code is provided above.
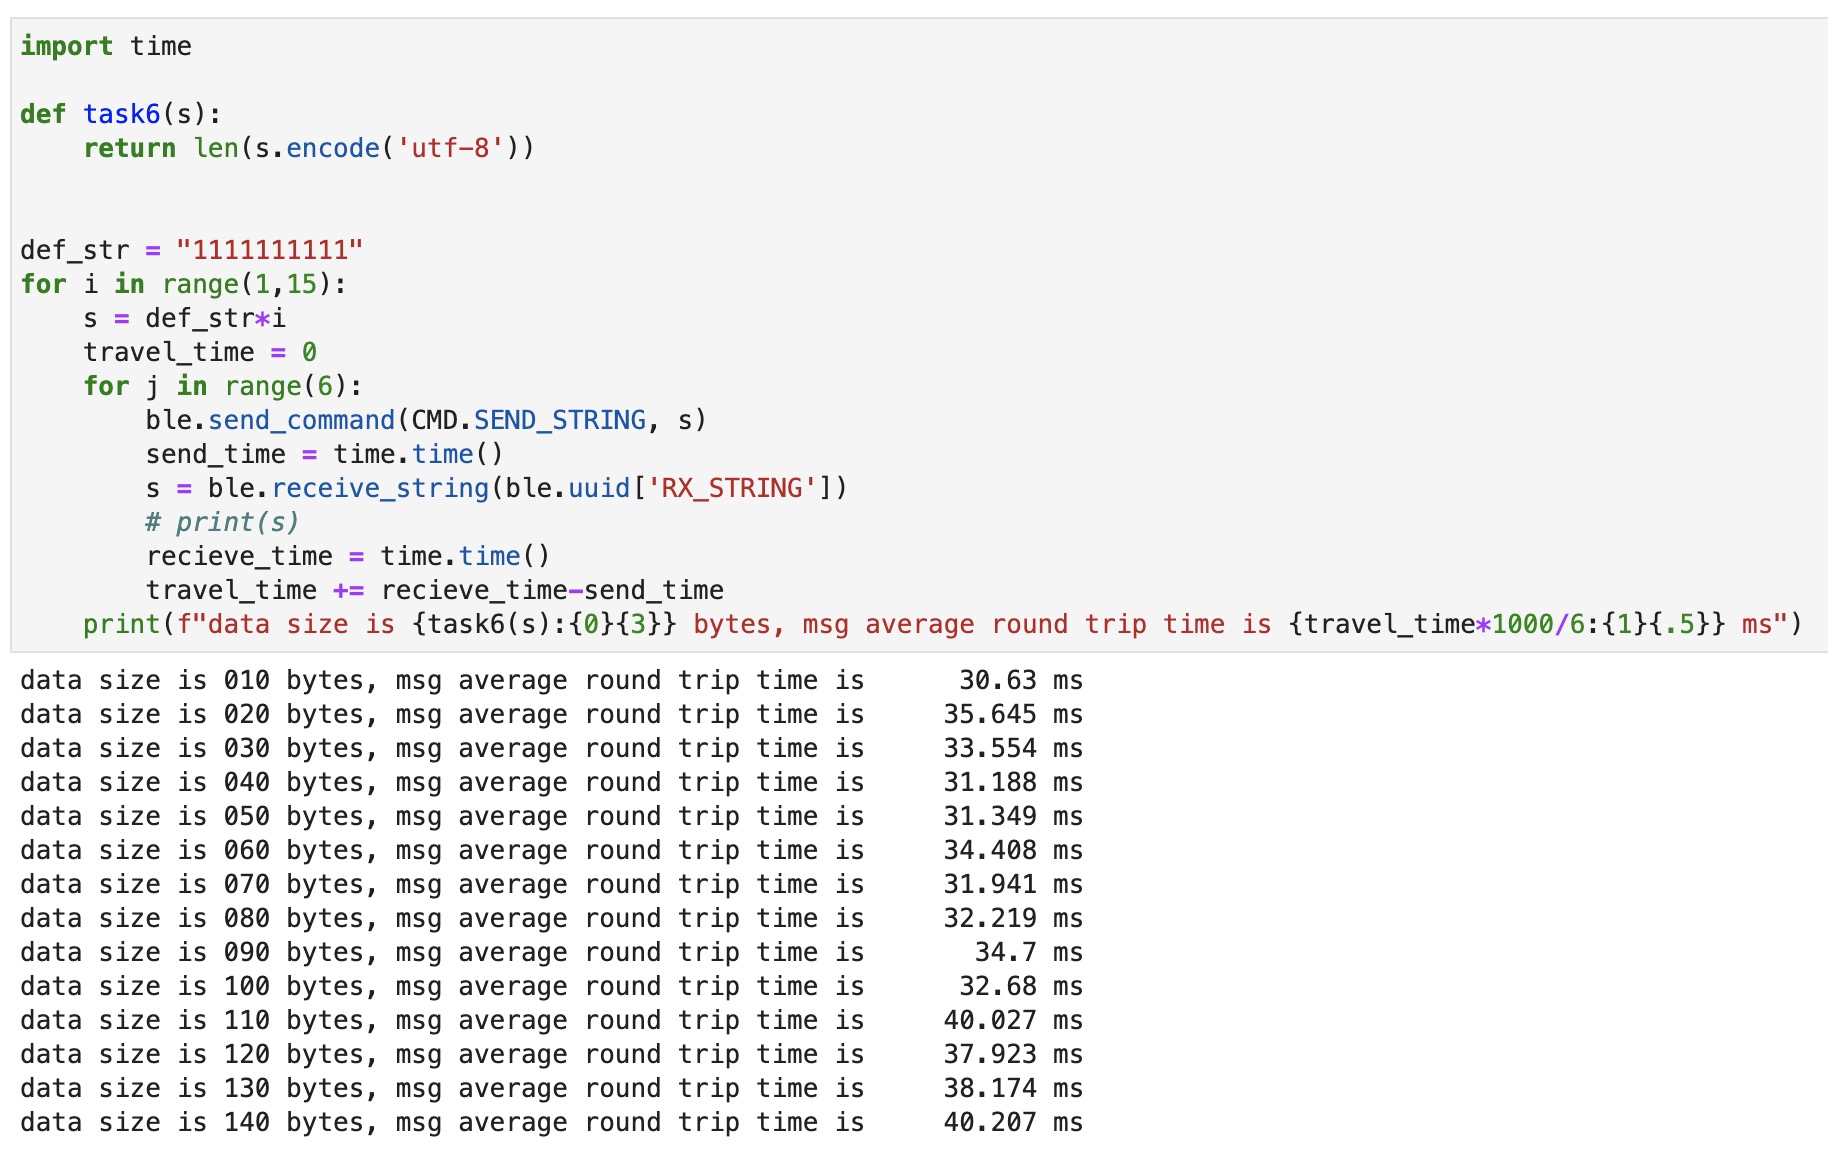
After getting the data above, I put them all in MATLAB to create the plot. The data rate can be calculated by using the data size/time. The plot result is shown below. It is an increasing line. Therefore, as the data size increases, the data rate will also be increasing. So, there will be a larger overhead if there are short packets. And larger replies can help to reduce the overhead.
Additional Task 2
I still use the same python and Arduino code in additional task 1, but I changed the range of the outer loop from (1, 15) to (1, 20). This can help to lengthen the string size. But when I run it, the system shows error with "Cannot write string larger than 150 bytes". So, it is reliable except the data size is larger than 150 bytes.